by lewis bishop
We all have to take screen grabs every now and then.
Perhaps you’re devising some instructional process notes for a new colleague or need to send a picture of a troublesome error message to the IT department. Maybe you just want to spill the tea to your work bestie and you need to snap the Teams chat in which Brian said that Kathy said that Kevin did you know what again at the Christmas work party.
There’s a good chance, then, that you’ll already be familiar with Microsoft’s Snipping Tool. It’s included in Windows Vista (and later but let’s assume you’re not using something older!) and is nearly old enough to buy you a gin and tonic. It’s a reliable snipping tool (the clue is in the name) that you can access from your keyboard at any moment.
(If you aren’t familiar with Snipping Tool, hold down Shift + Windows then press S – then draw a rectangle around the area on your screen that you’d like to include in the screenshot. At the time of writing it’s on version 11.2310.54.0.)
What you might not know about Snipping Tool, however, is that it has a Redact function to mask sensitive textual information. It’s surprisingly easy to take a screenshot, share it and inadvertently breach GDPR because there is identifying information in the picture. Perhaps you have gotten used to scribbling out sensitive details with the ballpoint pen function in Snipping Tool, but doing so can look very unprofessional/like a toddler doodled over your work with a Sharpie.
So, here’s a quick blog detailing how to use Snipping Tool to redact information in your screengrabs in a more professional, tidy and reliable way!
Quick Redact
Some information (phone numbers and email addresses) can be automatically redacted (all you have to do is press a button!), and for everything else you can do so manually.
Let’s look at a sensitive screengrab captured in Snipping Tool (see fig. 1).
Fig. 1 – Sensitive screengrab.
There is a toolbar in the top middle of this window. One of the icons is called Text actions (see fig. 2).
Fig. 2 – Text actions.
If you click on the Text actions button, it’ll show you what in the image it recognises as text, and two options will appear: Copy all text and Quick redact. The Quick redact button is the one that we’re interested in (see fig. 3).
Fig. 3 – Quick redact button.
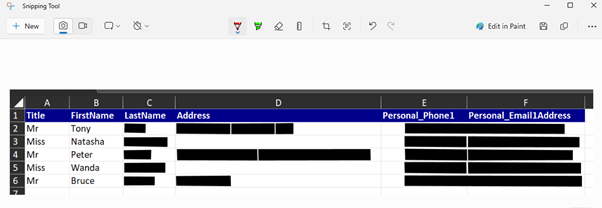
If any of this text looks like a phone number or an email address, Snipping Tool will redact that information for you in one go. Once you press the Quick redact button, you will notice that all phone numbers and email addresses have been automatically blacked out (see fig. 4).
Fig. 4 – Phone numbers and emails automatically redacted.
Look at that! Doesn’t it look like a classified document from a Jason Bourne movie?! No? Maybe that’s just me.
Manually Redact Text
There is a lot of sensitive information out there beyond phone numbers and email addresses. To redact that information, you’ll have to do it manually.
Highlight the text you’d like to redact, right-click it and select Redact text (see fig. 5).
Fig. 5 – Redact text manually.
Click Redact text and the highlighted text will be blacked out just like the phone numbers and email addresses were earlier. Repeat this step with any other sensitive text and voila! GDPR has been respected and you are free to share this screenshot with the world.
Fig. 6 – Voila!
For other tips, tricks and general lifehacks, please read other Productle blogs here.


